Building a Module Library
The module bar is the strip of tiles under the top bar. It ships with a catalog, it is editable, and the fastest way to add to it is to select some notes and press one button.
What ships
79 modules in six sections.
| Section | Modules | What's in it |
|---|---|---|
| Intervals | 46 | Every just ratio from 1/1 to the 23rd harmonic, plus six commas |
| Chords | 11 | Major, Minor, Dominant 7th, Harmonic 7th, Minor 7th, Major 7th, Diminished, Augmented, Sus4, Base-3 chord, Base-5 chord |
| Progressions | 8 | ii–V–I, I–IV–V–I, I–vi–IV–V, V7–I, plus four cadences |
| Melodies | 7 | Ode to Joy, Twinkle Twinkle, Frère Jacques, Amazing Grace, Greensleeves, Bach Minuet in G, Scarborough Fair |
| Scale Systems | 6 | 12-TET, 19-TET, 31-TET, Bohlen–Pierce, Tesla, Mixed-Base |
| Custom | 1 | canon base — and where your own modules land |

Tiles are drawn from the module's metadata. An interval shows its ratio as a stacked fraction with a cents caption (3 / 2, 702¢); a chord shows its name with the colon ratio underneath (Major, 4:5:6); everything else shows its name. The tile colour is its family:
| Family | Colour |
|---|---|
| 3-limit | amber |
| 5-limit | green |
| 7-limit | blue |
| higher (11–23-limit) | violet |
| comma | grey |
| chord | coral |
| progression / cadence | magenta |
| melody | teal |
| scale | cyan |
Search, don't scroll
Click the magnifier at the left of the library toolbar to unfold the search field (Search name, ratio, tag…). It matches name, ratio, cents, family and tags — so 3/2, septimal and comma all work as queries. Matches appear even inside collapsed sections. Closing the field (magnifier again, Escape, or blurring it while empty) always clears the query.
Getting your work into the library
The good way: Copy to Modules
- Select the notes. Shift-drag a marquee across empty background (desktop), or long-press empty space and drag (touch). Shift-click / long-press individual notes to toggle them in or out.
- Two or more notes selected → the group widget appears with the count.
- Press Copy to Modules.
The selection is saved into the Custom section as Selection (N notes) (uniquified with a trailing number if that name is taken), a toast confirms it, and the Custom section auto-expands if it was collapsed. The selection stays live — the action is non-destructive.
What you get is a genuinely reusable module, not a snapshot:
- The earliest selected note becomes the root and sits on the new module's BaseNote.
- Expressions that reference only notes inside the selection are copied verbatim (ids renumbered). So
[1].t + [1].dstays[1].t + [1].d— internal branching survives. - Expressions that reached outside the selection would dangle, so they are rebuilt against the new base as ratios and beat offsets:
k * base.f,base.t + beat(base) * k,beat(base) * k. - The new BaseNote is a copy of your current one, so
base.fandbeat(base)keep meaning what they meant, and pitches survive as ratios — which is what lets the copy transpose correctly when you drop it on a different note.
Drop the copy back onto the note it came from and it lands exactly on top of itself.
Per-note color and instrument are carried into the copied module too, along with the BaseNote's instrument — the copy keeps its look and its timbre, not just its pitch, timing and structure.
Copy to Modules is not undoable
It writes to the library, not to your composition — so Ctrl+Z will not remove it. To get rid of a copy, delete its tile (the red × on the icon).
The other way: upload a file
- + menu → Save Module. A file downloads, always named
module.json— which is why you have to rename it. - Rename it descriptively.
- Click the dashed
+placeholder at the end of any section. It is an upload button, not a "new module" button — it opens a file picker (.jsononly). - Pick your file. On success:
Module "NAME" uploaded successfully.
The file is validated on the way in: it must have a baseNote object and a notes array, at most 10 000 notes, unique integer ids in 0…65535 (the same u16 ceiling the loader and both expression parsers enforce), and every expression and colour must pass validation. A bad file is rejected with Invalid module: <errors>.
Save Module reindexes
The exported file is not a byte-copy of what you were looking at. Everything is renumbered from 1 in one run: measures first (sorted by start time), then the notes (also sorted by start time), so a module with three measures hands its first note the id 4. Every [N] reference is rewritten to match. The music is identical; the ids are not.
Using a module
Drag a tile out of the bar and drop it on a note, on the BaseNote circle, or on a measure bar. The module's notes are grafted in, with every base.* reference re-anchored to the drop target and its internal ids renumbered so nothing collides.
| Drop target | Result |
|---|---|
| A note | Imported and re-rooted onto that note |
| The BaseNote circle | Imported keeping its base.* anchors |
| A measure bar | Timing anchors to the measure; frequency stays on base.f (a measure bar has no pitch) |
| A silence | Rejected — "Cannot drop onto a silence." |
| Empty background | Rejected — "Drop onto a note or the BaseNote circle to import a module." |
You cannot drop a module onto empty workspace
There is no "load it wherever" fallback. A drop that misses a note, the BaseNote or a measure bar produces an error toast and does nothing. Modules are always imported onto a target.
Drop mode: Start / End
The Start / End drop-mode buttons are the two arrow-against-a-bar icons in the library toolbar, just left of Undo/Redo. They work as a radio pair — exactly one is lit — and the default is Start.
| Mode | Button | Effect on a note |
|---|---|---|
| Start | ⇤ | The module's notes anchor to the target's start time |
| End | ⇥ | The same, plus + [target].d on the start expressions — the module lands at the target's end |
Start stacks (chords). End chains (scales, melodies). The choice is remembered across sessions.
Dropping on the BaseNote ignores the drop mode entirely. The End adjustment only applies to a real note.
An import is one undo entry (Import Module at <id>), and playback pauses first if it was running.
Organising the bar
| Action | How |
|---|---|
| Collapse / expand a section | Click its label chip. ▾ = expanded, ▸ = collapsed with a count badge |
| Reorder sections | Drag one label chip onto another |
| Reorder modules | Drag a tile onto another tile — they swap, including across sections |
| Move a module to another section | Drag it onto that section's + placeholder |
| Delete a module | The red × on the tile → Yes, Remove |
| Delete a section | The red × on its label chip → Yes, Remove Category |
| Add a section | Add Category → type a name |
| Resize the bar | Drag the small pull-tab hanging below it |
Collapse state, section order and tile order all persist.
Sections are flat
There is one level of section. No nested subcategories. With search matching ratios, families and tags, this matters much less than it used to.
Settings that affect the library
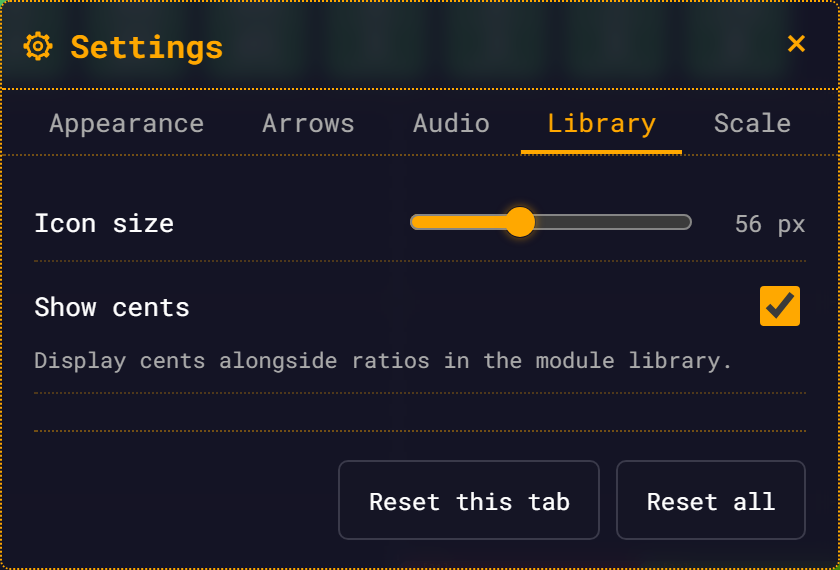
Open the Settings panel from the gear in the top bar, then the Library tab:
| Setting | Default | Range |
|---|---|---|
| Icon size | 56 px | 32–96, step 4 |
| Show cents | on | — |
Both apply live.
Undo and Redo
The library toolbar has its own Undo and Redo buttons at the right end (Ctrl+Z / Ctrl+Y). They are the same history as the "+" menu's buttons — they exist so you can reach history without leaving the bar. Clicking them does not clear your note selection.
Backing up
| Action | What it does |
|---|---|
| Save UI | Downloads the whole layout as ui-state.json — sections, order, collapse state, uploads, drop mode |
| Load UI | Imports a ui-state.json. Every embedded module is re-validated; invalid ones are skipped and reported |
| Reload Defaults | Confirms, then wipes your layout and rebuilds from the shipped catalog. Irreversible |
The layout also autosaves to browser localStorage (key ui-state) — 200 ms after any structural change, every 30 seconds, and on page unload.
Clearing browser data wipes your library layout
Built-in modules are stored by reference and come back on their own. Your uploads and Copy-to-Modules results are stored only in localStorage — clearing site data destroys them. Press Save UI and keep the file if they matter.
Good news: on every load, the stored layout is reconciled against the shipped catalog. Modules whose files no longer exist are dropped (no broken tiles), kept built-ins get fresh metadata, and newly-shipped modules and sections are appended — all without you pressing Reload Defaults. Your Custom section, your own sections and your uploads are always preserved.
Designing a module worth reusing
Anchor to base, not to numbers
base.f * (5/4) # transposes when the BaseNote changes263 * (5/4) # frozen; a dead numberA module whose pitches are ratios of base.f re-roots correctly onto whatever note you drop it on. A module full of absolute frequencies does not.
Keep it self-contained
Every [N] in a module must name a note inside that module. A reference that reaches outside would dangle the moment the module is imported somewhere else. This is enforced for every shipped module by npm test, and it is what lets a module be dropped onto both a note and the BaseNote.
Build a real tree, not a flat list
This is the design decision the shipped catalog is built on, and it is worth copying.
A chord is not three independent pitches. It is a root plus relationships: note 1 is base.f, and every chord tone is (s/n) * [1].f. A progression chains the roots — each later root is expressed from the previous root, and only the first root ever touches base.
The payoff: octave-shifting the first root transposes the entire progression. Every chord, every tone, follows, because everything downstream is defined relative to it.
Compare a scale, which the Scale Systems modules build as a chain — each note is the previous note's frequency times one step:
[4].f * 2 ^ (1/12)Lift one note and every note after it follows.
Adding a module to the shipped catalog
If you are working on RMT Compose itself, the shipped catalog is driven by a single v2 manifest, public/modules/library.json — the per-directory index.json files are a legacy fallback the live bar never reads. Put the module file under public/modules/<section>/, add an item entry to the manifest (its name, ratio, cents, family and tags drive the tile artwork and the search), and run npm test to validate it. The manifest format and full steps are in Module Bar.
Next
- Exploring Intervals — the 46 intervals in detail
- Microtonal Experiments — building a microtonal collection
- Module Bar — full interface reference
- Module Schema — every field in the file format