Module Bar
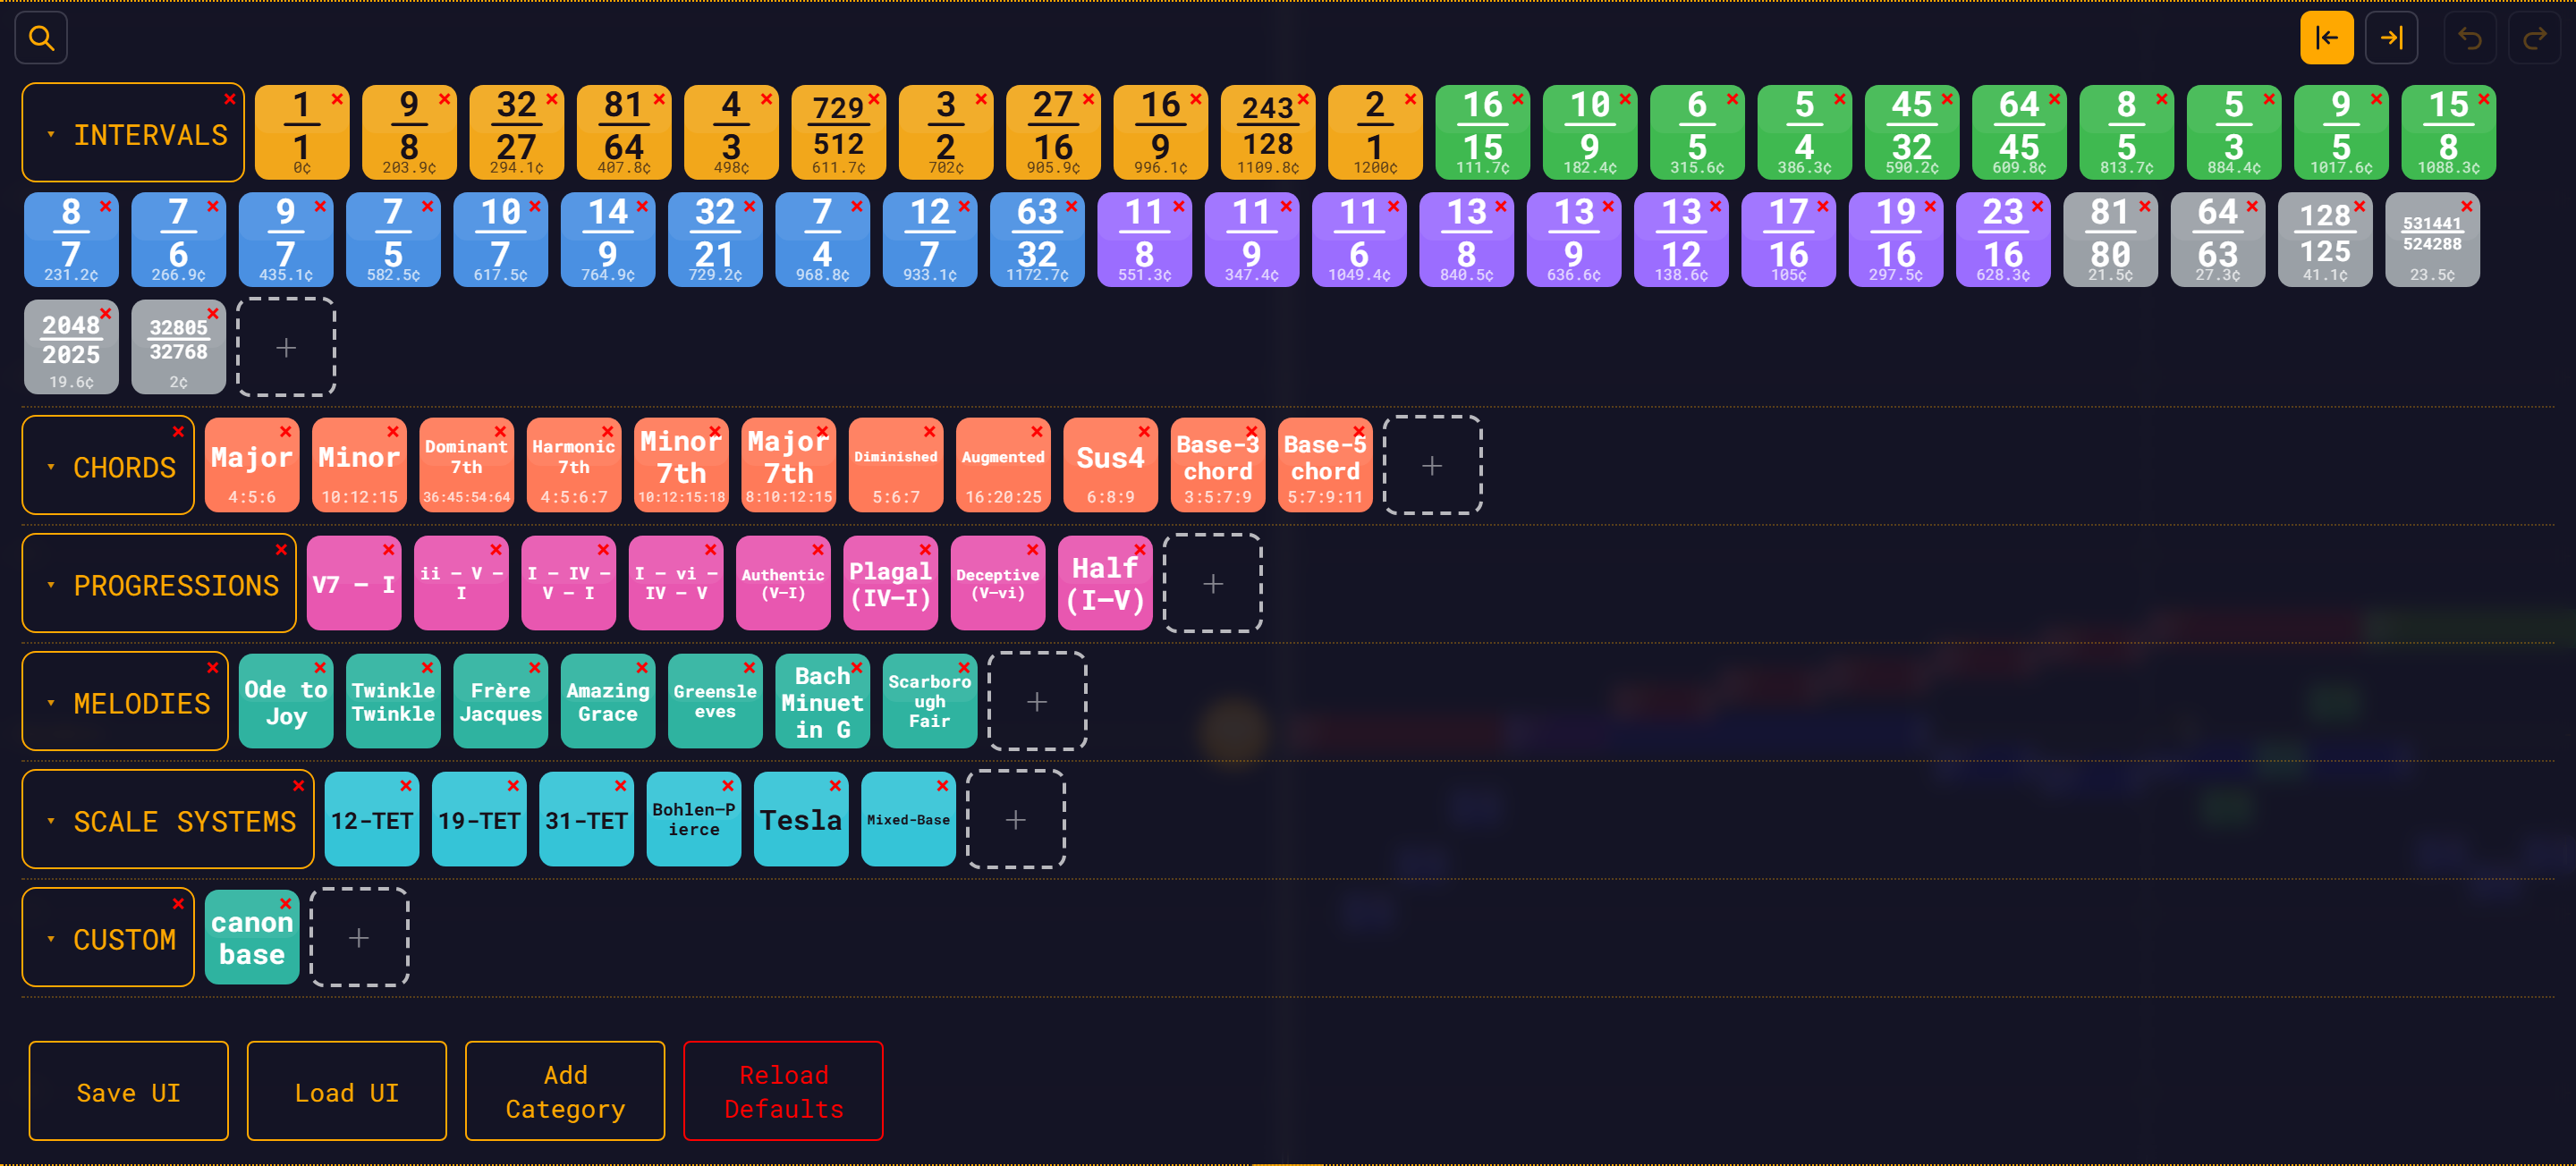
The module bar is the panel pinned under the top bar. It holds the shipped catalog — 79 modules across six sections — and it is where you grab a module and drag it onto a note.
The bar is yours to rearrange. Sections collapse, tiles swap places, you can upload your own .json modules, add your own sections, and the whole layout is saved in your browser.
For what is actually in the catalog — and why every module is built as a relational tree — see Module Library.
Anatomy
| Zone | What is in it |
|---|---|
| Toolbar row (top, always visible) | Left: the search magnifier. Right: the Start / End drop-mode buttons, then Undo and Redo. |
| Icons area (scrolls) | One row per section: the section label chip, its module tiles, then a dashed + tile. Dotted lines separate sections. |
| Bottom of the icons area | Save UI, Load UI, Add Category, Reload Defaults. |
| Pull tab | A small accent-coloured tab hanging below the bar. Drag it up or down to resize the bar. |
The bar opens on first run tall enough for the toolbar plus one row of icons. After that, its height is yours — but note that it shrinks itself when the content gets shorter (widen the window and icons unwrap onto fewer rows) and it never grows itself back. Drag the pull tab to open it up again.
The toolbar
Search
Click the magnifier (Search modules) and the search field unfolds. Type to filter the library live.
A module matches if your text appears anywhere in its name, ratio, family, cents, tags, file path, or the text drawn on its tile. So 702 finds the Perfect 5th, septimal finds the ten 7-limit intervals and the two chords tagged septimal (Diminished, Harmonic 7th), dorian finds Greensleeves and Scarborough Fair, and cadence finds all four cadences.
While you are searching, matches are revealed even inside collapsed sections, and sections with no match are hidden entirely.
Close the field by clicking the magnifier again, pressing Escape, or clicking away while it is empty. A field that still holds a query stays open when you click away — the library is filtered, and the query has to stay visible.
TIP
Closing the search always clears it. You can never end up with a silently filtered library hiding behind a folded-away field.
The drop mode buttons
Between the search field and the history pair, pinned to the right end of the row, sit two icon buttons — ⇤ and ⇥, an arrow pushed against a bar. They set the drop mode: whether a dropped module lands at the target note's Start or its End. Exactly one of the two is always lit, filled solid in the accent colour. What the modes actually do is covered below.
Undo and Redo
The two buttons at the far right of the toolbar are the same Undo and Redo as in the + menu and the same as Ctrl/Cmd + Z and Ctrl/Cmd + Y. They exist so history is one click away without opening a menu. Both are greyed out when there is nothing to undo or redo.
WARNING
These undo your composition, not the library. Nothing you do to the bar itself — deleting a module, removing a section, reordering tiles — goes on the undo stack. Deleting a category is not undoable; use Save UI first if you care about the layout.
Sections
Six sections ship: Intervals, Chords, Progressions, Melodies, Scale Systems and Custom. Labels are drawn in uppercase on the chips.
| Action | How |
|---|---|
| Collapse / expand | Click the section's label chip. The chevron flips from ▾ to ▸, and a collapsed chip shows the number of modules inside it. |
| Reorder sections | Drag a label chip onto another chip. On touch, press and drag it. |
| Add a section | Add Category → type a name. It appears in uppercase; the internal id is a slug of what you typed. |
| Delete a section | Click the red × on the chip → Yes, Remove Category. This removes the section and every module in it. |
Collapse state is saved. Collapsed chips pack onto shared rows, so a library folded down to six chips takes one row — a good way to keep the bar short while you work.
Module tiles
Each tile is a rounded square, 56 px by default, with a red × in its corner — the × is always there, not a hover reveal. Hover the tile for a white border and an accent glow.
What a tile shows
Tiles are drawn from the catalog's own metadata, not from a picture file. What you see depends on what the module is:
| The module has | The tile shows | Example |
|---|---|---|
A simple ratio (3/2) | The ratio as a stacked fraction, with the cents underneath | 3/2 and 702¢ |
A colon ratio (4:5:6) | The name, with the ratio as a caption under it | Major and 4:5:6 |
| Neither | The name, word-wrapped | Ode to Joy |
The tile's colour is its family:
| Family | Colour | Who wears it |
|---|---|---|
3-limit | Amber | Pythagorean intervals |
5-limit | Green | Classic just intervals |
7-limit | Blue | Septimal intervals |
higher | Violet | 11-, 13-, 17-, 19- and 23-limit intervals |
comma | Grey | Commas |
chord | Coral | Chords |
progression, cadence | Magenta | Progressions and cadences |
melody | Teal | Melodies |
scale | Cyan | Scale Systems |
So the whole library is legible at a glance: colour tells you the family, the tile face tells you the interval.
Hovering a tile gives you its name, and its ratio and cents where it has them — Perfect 5th (3/2, 702¢).
Two tiles look different on purpose:
- A module you uploaded is a flat accent-coloured tile with its name in plain text. It has no family metadata, so there is nothing to draw.
- A grey tile with a small red dot is a module whose file could not be loaded. Its tooltip says Module data failed to load. It will not import.
Rearranging and deleting
| Action | How |
|---|---|
| Swap two modules | Drag one tile onto another. They trade places — including across sections. |
| Move a module into another section | Drag its tile onto that section's dashed + tile. |
| Delete a module | Click the red × → Yes, Remove. |
Dropping a module into the workspace
Drag a tile out of the bar and drop it on the workspace. The module's notes are added to your composition with every dependency re-anchored to what you dropped on — this is the whole point of the library, and it is worth reading Module Library to understand what you are getting.
Drop mode: Start or End
The drop mode is set by the two icon buttons in the toolbar, just left of Undo and Redo: ⇤ (Drop modules at note start) and ⇥ (Drop modules at note end). They are a radio pair — exactly one is active, drawn filled in the accent colour, and clicking the active one again does nothing. The default is Start, and the choice is saved.
| Mode | What a dropped module does |
|---|---|
| Start | The module starts when the target note starts. Every base.t in it becomes [target].t. |
| End | The module starts when the target note ends. Imported start times that reference the target's start also pick up + [target].d. |
Use End to chain modules: drop one onto the last note of a phrase and it lands right after it, and it stays right after it if you later resize that note.
WARNING
Drop mode is ignored when you drop on the BaseNote. A module dropped on the BaseNote always keeps its own base.* anchors and starts where the BaseNote starts, whichever button is lit.
Where you can drop
| Target | What happens |
|---|---|
| A note | Start time, duration and frequency all re-anchor to that note. The drop mode applies. |
| The BaseNote | The module keeps its base.* anchors — you get it exactly as the author wrote it. Drop mode is ignored. |
| A measure bar | Start time and duration anchor to the measure bar. Frequency stays anchored to base.f, because a measure bar has no pitch. |
| A silence | Rejected: "Cannot drop onto a silence. Drop on a note or the BaseNote instead." |
| Empty background | Rejected. Modules import onto something, not into space. |
Two more things happen on a successful drop:
- If playback is running, it pauses first.
- The import is captured in history, so
Ctrl/Cmd + Ztakes it straight back out.
Adding your own modules
Upload a file
Click the dashed + tile at the end of any section and pick a .json file. It is validated before it is accepted — bad expressions, duplicate note ids or more than 10 000 notes are rejected with the reason. On success the tile appears in that section and the file is stored in your browser, so it survives a reload.
Copy a selection into the library
Select several notes in the workspace and the group widget offers Copy to Modules. It builds a self-contained module from your selection — rooted at its earliest note, with the dependency tree intact — and files it in Custom as Selection (N notes). If Custom is collapsed, it expands so you can see the new tile.
The copy is complete: structure and pitches, but also each note's colour and pinned instrument, and the BaseNote's instrument, all survive into the copied module.
Icon size and cents
Two settings shape the bar, both on the Library tab of Settings: Icon size (56 px by default) and Show cents (on by default). Both apply immediately.
Turn the icons down and the whole 79-module catalog fits in far less vertical space; turn Show cents off if you would rather read ratios alone.
Resizing the bar
Drag the pull tab hanging below the bar up or down. It works with the mouse and with a finger.
Saving your layout
Your library layout — section order, collapse state, tile order, uploads, and the drop mode — is saved to your browser automatically: whenever you change something, every 30 seconds, and when you close the tab.
| Button | What it does |
|---|---|
| Save UI | Downloads the layout as ui-state.json. |
| Load UI | Imports a ui-state.json. Every module embedded in it is re-validated; anything invalid is skipped and reported. |
| Reload Defaults | Confirms, then throws away your layout and rebuilds the library from the shipped catalog. Irreversible. |
TIP
Save UI is your backup. Clearing your browser's site data wipes the layout, and Reload Defaults deliberately does too — including any modules you uploaded.
You do not need Reload Defaults to pick up new shipped content. Every time the app loads, your stored layout is reconciled against the shipped catalog: modules whose files no longer exist are dropped, built-in modules get fresh metadata, and modules or sections that are new in the catalog are added. Your Custom section, your own sections and your uploads are always kept.
Adding a module to the shipped catalog
This is for people working on RMT Compose itself, not for uploads.
The catalog is described by one file: public/modules/library.json, a v2 manifest.
{
  "version": 2,
  "sections": [
    {
      "id": "intervals",
      "label": "Intervals",
      "items": [
        {
          "file": "intervals/3-2.json",
          "name": "Perfect 5th",
          "ratio": "3/2",
          "cents": 701.955,
          "family": "3-limit",
          "tags": ["P5", "perfect", "fifth"]
        }
      ]
    }
  ]
}To add a module permanently:
- Put the module
.jsonunderpublic/modules/<section>/. - Add an item to that section's
items[]inlibrary.json. Onlyfileis required;name,ratio,cents,familyandtagsare what give the tile its face, its colour, and its searchability. - Run
npm test. It validates every module in the manifest — structure, expression syntax, that the module is self-contained, that it evaluates to finite values, and (for single-note intervals) that the ratio and cents agree with what the expression actually produces.
Existing users pick the new module up on their next load; they do not need to press Reload Defaults.
WARNING
The per-section index.json files under public/modules/ are a legacy fallback, used only if library.json cannot be loaded at all. Editing them does nothing while the manifest exists. Older documentation told you to edit them — it was wrong.
See also
- Module Library — the 79 shipped modules and how they are built
- Module Format — the module JSON schema
- Loading Modules — loading a module as your whole composition
- Workspace — where you drop them